How to Mix and Match Elden Ring Armor Parts with Blender and Modding Tools

Suppose in Elden Ring you want to add the scarf from the (altered) Nomadic Merchant’s Finery and place it on top of the (altered) Confessor Armor. In other words, you want to go looking from this:

To this:

To mix and match armor parts in Elden Ring, you will need the following tools:

  • UXM Selective Unpacker – Extracts .DCX files from Elden Ring’s data files
  • ModEngine2 – A mod launcher for Elden Ring
  • WitchyBND – Packs and unpacks .DCX and .TPF files
  • Pear’s FLVER Editor – AKA FLVER Editor 2.0. A simple FLVER model editor. Will be used to import, adjust and delete meshes.
  • Aqua Model Tool – Converts .FLVER files to .FBX files so that they can be edited in Blender
  • Blender – FLVER_EDITOR has limited editing capability. If we want to do something such as splitting a mesh, we will need to use a more robust 3D editing program such as Blender.
  • ER_Base_Male.blend – Blender file containing the base male player model. Created by Dasaav.
  • Grand Merchant – Mod that will be loading our custom armor parts
  • Elden Ring Item Data Sheet – A spreadsheet containing model numbers for armor parts

See each tool’s webpage for installation instructions. Also be sure to read part 1 of my How to Resize Armor Parts… tutorial for instructions on how to extract .DCX files with the UXM Selective Unpacker.

Part 1: Setup

According to the item data sheet, the .DCX files for the Confessor Armor (Altered) and the Nomadic Merchant’s Finery are bd_m_1401.partsbnd.dcx and bd_m_1711.partsbnd.dcx respectively. After copying and pasting those two files from the parts folder to your work folder, open your WitchyBND folder in a new window and drag each .DCX files onto WitchyBND.exe. This will create two folders named “bd_m_1401-partsbnd-dcx” and “bd_m_1711-partsbnd-dcx.” Each folder contains a .FLVER file (BD_M_1401.flver and BD_M_1711.flver) with all the mesh data.

You’ll also see .TPF files of the same name in these folders. TPF files contain all the model’s textures. To extract these textures, drag those .TPF files onto WitchyBND.exe. Doing so will create new folders (BD_M_1401-tpf and BD_M_1711-tpf) in the same folder as the .TPF files.

Finery folder after .tpf file extracted

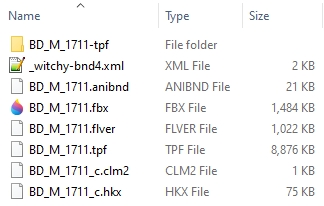
We now need to convert these .FLVER files into .FBX files. Open your Aqua Model Tool folder and drag each .FLVER file onto SoulsModelTool.exe. Doing so will generate new .FBX files inside the same folder as your .FLVER file.

Part 2: Blender

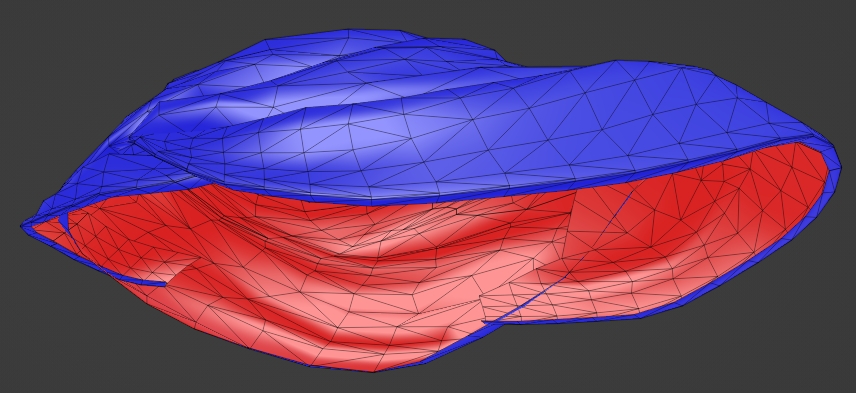
Open Blender and import the Confessor Armor .FBX file (BD_M_1401.fbx). On the Confessor Armor, you’ll notice some straps on the shoulders that will likely poke through a Finery scarf and thus should be removed. These straps belong to a mesh named “belt.”

In the outliner, open the Spine armature and look for the mesh named “mesh[3],” the mesh that corresponds to “belt.” Rename mesh[3] to “Belt” (i.e. the mesh’s material name) and delete all the other Confessor Armor meshes. With Belt still selected, go into edit mode and delete the shoulder straps. After editing the mesh, delete the BD_M_1401_model empty object. Export everything as an .FBX file and name the .FBX file modded_belt.fbx.

Now create a new Blender file and import the Finery mesh (BD_M_1711.fbx). The scarf meshes are mesh[17] and mesh[18], with mesh[18] being used when a player wears a helmet and mesh[17] when a player does not. Rename mesh[17] and mesh[18] to “#32#” and “#33#” (i.e. their material names) respectively and delete the other 17 meshes that came with BD_M_1711.fbx.

When we exported to modded_belt.fbx, we not only exported the Belt mesh but also the Spine armature the Belt mesh was attached to. Unfortunately, we won’t be able to do the same for the scarf meshes. It might have to do with the fact that the scarves come from a different model, and thus have a different Spine armature compared to the Confessor Armor’s Spine armature, but I’m not sure if that’s the main reason. What is certain is that if we export the meshes with the Finery’s Spine armature, the scarves will appear glitched in game. Therefore, the armature we will be using (“skeleton”) will come from the ER_Base_Male.blend file I posted earlier.

In Blender, go to Append and open ER_Base_Male.blend. Inside the Blender file, open the Object folder, select the object named “Body” and press Append. Upon appending, you’ll see a large sphere mesh on your screen named “smd_bone_vis.” Delete this sphere so you can see the base male player mesh. With the skeleton armature selected, go to object properties and, under transform, set the X rotation to 90°. If the armor appears backwards on the ER_Base_Male.blend body mesh, delete the imported mesh, open SoulsModelTool.exe, uncheck the “Fix FromSoft Mesh Mirroring” option and re-import the .FBX again.

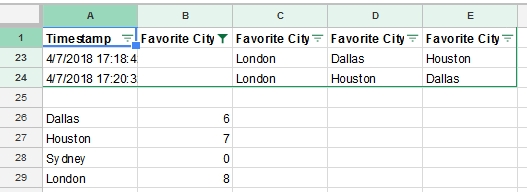
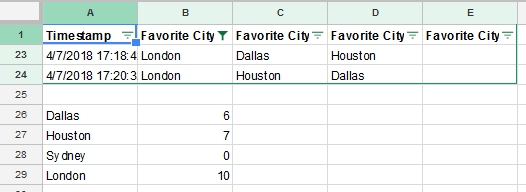
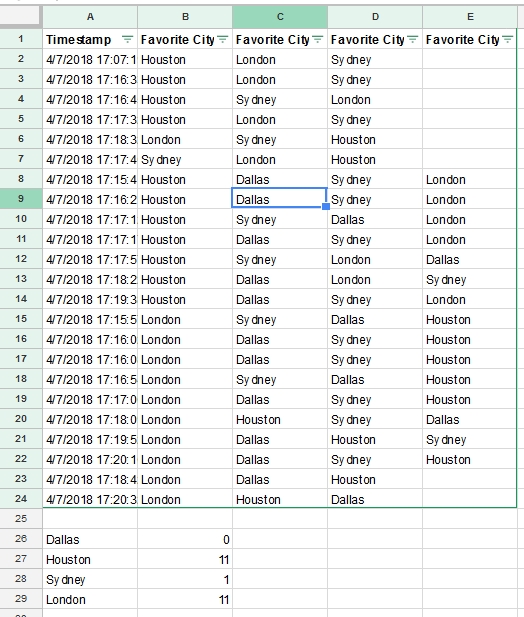
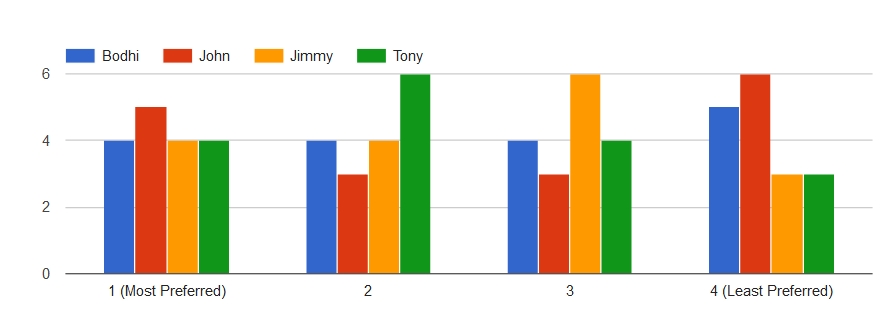
The armor meshes are still hooked to the Aqua Model Tool Spine armatures. To get them pointed at ER_Base_Male’s skeleton armature, go to each mesh’s Modifier Properties and change Object from “Spine” to “skeleton.” You do not need to change the modifier name.

With your meshes pointed at the skeleton armature, we now need to separate the scarf meshes from the Spine armature. To do so, select the two meshes and press Alt+P. Doing so will bring up the Clear Parent menu. In the Clear Parent menu, select the “Clear and Keep Transformation” option and click in the Layout workspace to apply. From here, you can now delete the Spine armature, as well as the ER_Base_Male body mesh.

Export the scarf meshes to an .FBX file and name it modded_scarf.fbx.

Part 3: FLVER

Before we import our .FBX file, let’s first look at our mesh’s MTD files i.e. material definition files. First, open BD_M_1711.flver with Pear’s FLVER Editor and click on the Materials tab. Scroll down to #32# and #33# to see that the MTD path for both scarf meshes is “N:\GR\data\Material\mtd\Parts\matxml\P[BD_M_1711]_FabricAdd.matxml”; the stuff after “…\matxml\” will be important when we import the .FBX file. Now open BD_M_1401.flver and click on that .FLVER’s Materials tab. Looking at the belt entry, we see that the MTD path is “N:\GR\data\Material\mtd\Parts\matxml\P[BD_M_1400]_Belt.matxml”.

With BD_M_1401.flver still open in the FLVER Editor, go to File -> Model -> Import. In the Open FBX File window, go to where your exported your .FBX file and select (don’t double click) modded_belt.fbx. Remembering what we saw in the materials tab, set MTD Selector for Belt to P[BD_M_1400]_Belt.matxml. Afterwards, click the “Open” button to import the modded_belt.fbx. Do the same for modded_scarf.fbx., but this time for meshes #32# and #33#, set MTD Selector to P[BD_M_1711]_FabricAdd.matxml.

In the Mesh table, select and delete the the original “Belt” mesh (index 3). Then adjust the scarf meshes so that they don’t clip through the Confessor Armor; for me, I moved the meshes +1 in the Y direction.

Let’s return the Materials tab. Make sure the Model Mask values for #32# and #33# are 32 and 33 respectively. You’ll also notice that the MTD path for the imported meshes lack the full MTD Path the other meshes have. This is fine. Now save the .FLVER file.

With the .FLVER saved, the scarf meshes will now be referencing textures from the Merchant’s Finery. However, we still need to pack those Finery textures into the same TPF file as our Confessor Armor textures. To do that, go to your BD_M_1711-tpf folder, copy the three .DDS files inside that folder and paste them inside your BD_M_1401-tpf folder.

With the .DDS files copied, we now need to edit _witchy-tpf.xml, the XML file that will instruct WitchyBND which .DDS files it needs to pack when creating the .TPF file. In your BD_M_1711-tpf folder, open _witchy-tpf.xml and copy the highlighted block of code:

Return to the BD_M_1401-tpf folder, open that folder’s _witchy-tpf.xml file and paste that block of code between the <textures> (NOT <texture>) tags. BD_M_1401-tpf’s _witchy-tpf.xml file should now look like this:

Drag your BD_M_1401-tpf folder onto WitchyBND.exe to create your new BD_M_1401.tpf file (file size ~18MB). Then drag your bd_m_1401-partsbnd-dcx folder onto WitchyBND.exe to create your new bd_m_1401.partsbnd.dcx (file size ~12MB).

Inside the Grand Merchant folder, create a new folder named “parts.” Inside “parts,” copy and paste your modded bd_m_1401.partsbnd.dcx file that you created with WitchyBND. To load Grand Merchant into ModEngine2, open config_eldenring.toml in a notepad program and scroll down to around line 29. Assuming your Grand Merchant folder is inside the mod folder, make sure your block of code look like the following:

mods = [
    { enabled = true, name = "default", path = "mod\\GrandMerchant" }
]

Launch the Grand Merchant mod by clicking on launchmod_eldenring.bat. If it’s not already in your inventory, buy the Confessor Armor from Kalé. Now, when you equip your Confessor Armor:

Because we moved the Finery scarves up by 1 in Pear’s FLVER Editor, many helms, especially those with scarves themselves, will clip through those scarves. The scarf meshes can probably be sculpted so that they can fit on the Confessor Armor without the need to move them upwards. However, for the sake of brevity, I won’t be going over that stuff.

To summarize:

  1. Unpack .DCX and .TPF files with WitchyBND
  2. Convert .FLVER files to .FBX files with Aqua Model Tool
  3. Import .FBX files into Blender and delete irrelevant meshes
  4. Edit meshes in Blender
  5. For meshes from another .DCX file, append the body object from ER_Base_Male.blend and delete the smd_bone_vis sphere
    • Make sure under for each mesh’s the Armature Modifier that the Object option is pointed to the skeleton armature from ER_Base_Male.blend
    • Disconnect target meshes from Spine armature with Clear Parent command
    • Delete Spine armatures, body mesh and empty objects
  6. Export to .FBX
  7. Open .FLVER file with Pear’s FLVER Editor
  8. Import .FBX files, making sure MTD Selector is pointing to the correct MTD
  9. Delete any meshes that you’ll be replacing
  10. Make sure MTD paths and Model Masks are correct
  11. Place all .DDS files into the same TPF folder
  12. Edit .XML inside TPF folder to load all neccesary .DDS files
  13. Create new .TPF and .DCX files with WitchyBND
  14. Place new .DCX file into your mod’s parts folder

You can see a scarf-topped Confessor Armor in the video below, starting at 5:05:

You’ll notice that I’ve made further changes to the Confessor Armor so that it resembles the Halberdier’s armor from Age of Empires II. First, I recolored the leather flaps and scarf by following this guide from HonorKinght26. Then I removed the Chain_Cloth mesh so that chain patterns won’t appear in front of the leather flaps.

Part 4: Notes

Some of this article was based on this video tutorial from Scrub Milk. Special thanks to jessieli4944, who pointed out in the comment section to make sure that the Object option in the Armature Modifer is pointed to ER_Base_Male’s skeleton armature.

If you hook the Confessor belt mesh to the ER_Base_Male skeleton armature instead of the original Spine armature, the belt mesh will still fit on your player character. However, it will move out of sync with the rest of your character.

The interiors faces of the Finery scarves have backface culling.

Red = backface culling faces
Backface culled faces marked in red

The FLVER Editor, on the other hand, disables backface culling for imported .FBX meshes. To enable backface culling, select meshes #32# and #33# and check the Toggle Backface Culling box. After checking that box, save your .FLVER file.

We probably don’t want to enable backface culling for our example, though. These scarf faces were chosen to be backface culled because they were flush to the Finery shirt. If placed on another armor mesh, it’s not guaranteed that these faces will be flush to the new mesh. Therefore, to play it safe, backface culling should remained disabled so that the meshes will be visible regardless of viewing angle.

This tutorial will probably not work if you’re trying to import meshes that contain cloth physics such as capes or dresses. To see if your mesh has cloth physics, search for “cloth” in Blender’s outliner search box. If you see vertices with “[cloth]” in their names, then said mesh has cloth physics. Unfortunately, I haven’t figured out how to deal with cloth physics. Therefore, I recommend for any armor you’re planning to import that you simply delete all meshes with cloth bones in Blender.

For example, in the video below, I recreated the Two-Handed Swordsman armor from Age of Empires II by importing Knight Armor meshes into the Gelmir Knight Armor (see 8:12). When creating the custom Knight Armor mesh, I deleted the metal and fabric flaps on the Knight Armor in Blender, two meshes with cloth bones.

If you do still want to deal with cloth physics, though, these tutorials from Scrub Milk might help you out:

Because these videos were uploaded only a few months after Elden Ring’s release, there are a few outdated things in them. Therefore, when following these videos, remember that

  • Aqua Model Tool instead of BBTool should be used to convert .FLVER files to a Blender-readable format
  • WitchyBND instead of Yabber can be used to pack/unpack .DCX and .TPF files
  • Pear’s FLVER Editor instead of the older Forsakensilver FLVER Editor can be used to delete meshes and edit MTD paths

Also note that with Aqua Model Tool, bone names already have “[cloth]” in their names, so you don’t need to go through the renaming process. The reason we need to rename bones with BBTool is because .SMD files cannot handle bracket texts (h/t Shadowth117 in the ?ServerName? Discord server).

How to Resize Armor Parts in Elden Ring with Modding Tools

Suppose in Elden Ring you want to shrink the size of the Iron Kasa helm. In other words, you want to go from looking this this:

To this:

To resize the Iron Kasa using mods, you will need the following tools:

  • UXM Selective Unpacker – Extracts .DCX files from Elden Ring’s data files
  • ModEngine2 – A mod launcher for Elden Ring
  • WitchyBND – Packs and unpacks DCX. In the context of this tutorial, we will be using this tool to extract the .FLVER model file.
  • Pear’s FLVER Editor – A simple FLVER model editor. Will be used to adjust, resize and delete meshes.
  • Aqua Model Tools – Converts .FLVER files to .FBX files so that they can be edited in Blender
  • Blender – FLVER_EDITOR has limited editing capability. If we want to do something such as splitting a mesh, we will need to use a more robust 3D editing program such as Blender.
  • Grand Merchant – Mod that will be loading our custom Iron Kasa
  • Elden Ring Item Data Sheet – A spreadsheet containing model numbers for armor parts

See each tool’s webpage for installation instructions.

Part 1: DCX Files

After installing the listed tools, start the UXM Selective Unpacker. In the Executable Path box, navigate and select your eldenring.exe file. After selecting eldenring.exe, click “View Files.” In the popup window, click the arrow next to EldenRing to show additional entries. Select the entry named “parts” and click OK. After clicking OK, click the Unpack button. UXM will now extract all the armor and weapon DCX files into in a folder named “parts” inside Elden Ring’s Game folder.

Now we need to look for the Iron Kasa’s .DCX file. DCX files names have the following format:

The first two letters indicate the type of armor. In the context of Elden Ring,

  • AM = Gauntlets
  • BD = Chest Armor
  • HD = Helm
  • LG = Leg Armor
  • WP (not shown) = Weapons/shields

The next letter indicates body type (M for male, F for female), while the last four numbers are the model ID, which you can find item data sheet. Armor parts from the same set usually share the same model ID. In the screenshot above, these .DCX files correspond to the Kaiden Set (model ID 1840). The Kaiden Set doesn’t vary based on gender, hence the lack of female files. You also see some files with an “_l” after the model number. I don’t know what these DCX files do, but you can ignore them.

With this nomenclature in mind, let’s now look for the Iron Kasa .DCX file. According to the item data sheet, the model ID for the Iron Kasa is 1190. Because the Iron Kasa is a helm, its prefix is HD. Finally, the Iron Kasa (and Ronin Set in general) does not change appearance based on gender, which means we only need to modify the male file. Putting all this together, we can conclude that the Iron Kasa’s DCX file is hd_m_1190.partsbnd.dcx.

Copy hd_m_1190.partsbnd.dcx into a new folder, and then drag that .DCX file onto WitchyBND.exe. This will create another new folder named “hd_m_1190-partsbnd-dcx” in the same location as hd_m_1190.partsbnd.dcx. Inside hd_m_1190-partsbnd-dcx, you’ll see four files:

These files were unpacked using Yabber, an older .DCX unpacker that generated more nested folders. The extracted files remain the same, though.

The file containing the 3D mesh is HD_M_1190.flver.

Part 2: FLVER Editor

Open your FLVER_EDITOR 2.0 folder in a new window and drag HD_M_1190.flver onto FLVER_Editor.exe. After the FLVER Editor starts, go to the mesh tab, where you’ll see a mesh selection table. If you check the Select box for the mesh named “metal,” you will see in the FLVER Viewer that the Iron Kasa’s frame and head cushion are highlighted in yellow, but not the metal plates between the frames. To highlight the metal plates, you will also need to check the Select box for the metal_2side mesh.

Let’s shrink the Iron Kasa by 50%. To do so, type 50 into each of the scaling boxes. When you scale the Iron Kasa, you’ll notice that the cushion mesh clips through the rope. To stop this clipping, we need to move the scaled meshes up in the Y direction.

To help determine how much the scaled meshes should be moved and rotated, click on the Display Male Body button (shortcut CTRL-Shift-G). Using the Tarnished body that pops up as a reference, start tweaking your mesh. For me, moving the meshes up 2 in the Y direction and rotating them -2° in the Z direction was enough for the rescaled hat to appear natural.

Note that at the time of publishing, FLVER_EDITOR 2.0 is a bit glitchy. Sometimes, unselected meshes will be highlighted, while in other times, the program will display an unhandled exception error out of nowhere. If these things happen, do not save the .FLVER file and instead restart the FLVER_EDITOR. Saving when these glitches are happening will probably corrupt the file.

Navigate all the way back to where you copied your .DCX file. Click on the hd_m_1190-partsbnd-dcx folder and drag that folder onto WitchyBND.exe. Doing so will overwrite the original hd_m_1190.partsbnd.dcx file with a new .DCX file.

Inside the Grand Merchant folder, create a new folder named “parts.” Inside “parts,” copy and paste your modded hd_m_1190.partsbnd.dcx file that you created with WitchyBND. To load Grand Merchant into ModEngine2, open config_eldenring.toml in a notepad program and scroll down to around line 29. Assuming your Grand Merchant folder is inside the mod folder, make sure your block of code look like the following:

mods = [
    { enabled = true, name = "default", path = "mod\\GrandMerchant" }
]

Launch the Grand Merchant mod by clicking on launchmod_eldenring.bat. If it’s not already in your inventory, buy the Iron Kasa from Kalé. Now equip the Iron Kasa:

Elden Ring modding is convenient in that you don’t need to restart the game to view changes. You can replace .DCX files while the game is running, and all you need to do to see your modifications is to unequip and re-equip the corresponding armors/weapons.

Part 3: Blender

Suppose you want the resized Iron Kasa to cover more of the face. Also, because you don’t want the cushion clipping the ropes, you want to remove said cushion from the helm. Because the head cushion and iron frames are contained in the same mesh, you will need a program such as Blender to separate the two.

As of version 2.0, the FLVER Editor’s export mesh tool does not work correctly. Therefore, we need to use Aqua Model Tool to convert our .FLVER file into an .FBX file. To do that, drag your edited hd_m_1190.flver file onto SoulsModelTool.exe inside your Aqua Model Tool folder. When you drag your .FLVER file onto the Souls Model Tool application, a new file named hd_m_1190.fbx will be created inside the same folder as your .FLVER file.

In Blender, import hd_m_1190.fbx. When you do so, you’ll be greeted with the following sight:

All these spikes are armature bones. Clicking the eye button next to the Neck armature in the outliner will toggle their visibility. Underneath the Neck armature are four meshes: mesh[0], mesh[1], mesh[2] and mesh[3]. Mesh[0] corresponds to the metal mesh, while mesh[2] corresponds to the metal2_side mesh. Therefore, we can delete the other 2 meshes. We can also rename mesh[0] and mesh[2] to metal_new and metal2_side_new respectively.

Even though we’re only editing metal_new, we’ll actually be exporting both metal_new and metal2_side_new from Blender. I’ve found that if I don’t do it that way, then the Kasa frame and plates will move out of sync of each other. I have no idea why this happens.

In Blender’s Object Mode, select the metal_new mesh. Then, switch to edit mode, enable vertex select and select a vertex on the cushion. Go to Select -> Select Linked – > Linked (shortcut Ctrl+L) to select all the vertices on the cushion. If there are still non-selected faces on the cushion, switch to face select and add those faces to your selection. Once all cushion faces are selected, press the Delete key and, in the menu that pops up, select Vertices.

With the cushion vertices deleted, go to File -> Export -> FBX and, without touching any of the export settings, save your .FBX file. Reopen hd_m_1190.flver inside the FLVER Editor and import the .FBX file by going to File -> Model -> Import [New]; you can use the default import options. The mesh table will now have 6 entries.

Now we need to make sure the new meshes use the correct textures. First, click on the Materials tab. Copy metal’s MTD Path (N:\GR\data\Material\mtd\Parts\matxml\P[HD_M_1190]_metal.matxml) and paste it into metal_new’s and metal2_side_new MTD Paths (both meshes use the same materials). Also change metal_new and metal2_side_new flags to 1330 and 1342 respectively.

Go back to the Mesh tab, select the original metal and metal_2side meshes and, in the Modifiers section, click the Delete Selected button. Now readjust metal_2side_new and metal_new so that they cover more of face. For me, I moved the meshes -2 units in the Y direction, rotated them -15° in the Y direction and rotated them -1° in the Z direction.

Once you are satisfied with your tweaks, save the .FLVER file, drag the hd_m_1190-partsbnd-dcx folder onto WitchyBND.exe, and replace the previous hd_m_1190.partsbnd.dcx file in Grand Merchant’s parts folder with the new .DCX file. Once you re-equip the Iron Kasa, the Tarnished should now look like this:

To summarize, if you want to edit armor in Blender,

  1. Extract .DCX files with UXM Selective Unpacker
  2. Extract .FLVER file from .DCX file with WitchyBND
  3. Convert .FLVER to .FBX with Aqua Model Tool’s SoulsModelTool.exe application
  4. Import .FBX into Blender
  5. After editing the mesh(es) in Blender, export from Blender to a new .FBX file
  6. Open .FLVER file in FLVER Editor and import new .FBX file
  7. Scale and transform meshes in the FLVER Editor
  8. Make sure MTD Paths are correct
  9. Delete old meshes in FLVER
  10. Create new .DCX file with WitchyBND
  11. Copy new .DCX file into your mod’s parts folder

Here’s a video I uploaded showing the resized Kasa in action, starting at 3:05:

Part 4: Notes

Special thanks to Ivi on the ?SeverName? Discord for telling me about the Aqua Model Tool.

You’ll also notice in the Age of Empires II cosplay video that not only I’ve modified some of the meshes, I’ve recolored some of them too. For instructions on how to recolor meshes, take a look at this guide from HonorKnight26.

Part 5: Guide Updates

September 12, 2023: Removed references to the uniform scaling glitch in the FLVER Editor, as that issue has been fixed in version 2.1.2

September 16, 2023: Replaced references to Yabber with WitchyBND. WitchyBND is an updated version of Yabber with a simplified folder structure.

Age of Empires II: Definitive Edition Modding How To’s

King of the Hill-style scenario

Here are some guides I’ve written over the years on how to use modify Age of Empires II: Definitive Edition. These guides cover the scenario editor, AI scripting and the Advanced Genie Editor.

Source Engine Modding How To’s

GIF created for my How to Randomize Your Map Round-to-Round in Hammer guide

Here are some guides I’ve written over the years on how to modify the Source Engine. These guides were written for the Counter-Strike: Global Offensive, but they probably still apply for other Source Engine games.

Valve Hammer guides:

Custom skyboxes guides:

How to Conduct Instant Runoff Voting with Google Sheets (Part 2)

I’ve already covered to how to conduct instant runoff/single transferable voting voting with Google Forms in a previous post. However, dragging and deleting cells can become tedious if you have hundreds of votes. Fortunately, there’s another less tedious method to conduct IRV in Google Sheets without using scripts.

Part 1: Closed Party-List Proportional Representation with Single Transferable Voting (aka the Australian Senate method)

For this example, instead of a single winner election, we will be conducting a multi-member election with proportional representation using single transferable voting (STV) and closed party lists. In other words, voters will be ranking political parties, as opposed to individual candidates, on their ballots, and that STV/IRV concepts will be applied to parties initially falling below a certain threshold. This is similar to what is done in Australian Senate elections, or what is proposed here, (where it’s called ranked choice party list) or here.

Having voters rank party-lists can reduce the amount of wasted votes, especially in situations with high electoral thresholds. Say we want to fill in 5 seats on a pet-themed council using ranked choice party list. After 103 votes, we get the following results, with each animal corresponding to a political party (Cat Party, Dog Party etc.) and columns B, C and D indicating a voter’s 1st, 2nd and 3rd party choice respectively. Voters were not required to rank every single party. In turn, Cat and Dog voters, confident that their party will easily surpass the electoral threshold, merely bullet voted and did not express second or third preferences. Supporters of other parties, on the other hand, were less confident that their pets would receive a seat. Also, a rogue faction in the Fish party had recently separated from the original party to form the Goldfish party, potentially splitting the vote even more. Thus, most non Dog or Cat voters expressed 2nd and 3rd preferences.

Among first place votes, we get the following vote breakdown:

  • Cat: 42
  • Dog: 41
  • Goldfish: 8
  • Rabbit: 5
  • Horse: 4
  • Fish: 3
  • Parrot: 0

Using the Thomas Jefferson method (or the D’Hondt method for those of you who aren’t freedom loving ‘Muricans) to allocate the first place votes, Cat will receive 3 seats on the council, while Dog will receive 2 seats. Despite receiving over 19% of the first place vote, the Fish, Rabbit, Horse and Goldfish parties will not receive any representation on the council. Even when using a method that is more generous to smaller parties such as the Daniel Webster method (or the Sainte-Laguë method if you hate cheeseburgers and bald eagles), the non-Dog or Cat parties are still locked out of the council. Furthermore, because cats are evil, most third party voters had ranked Rabbit or Dog as either their 2nd or 3rd choices. In other words, a more representative council would not have cats in the majority.

Using ranked choice voting concepts in this situation can help give the 19% a chance to influence the final results of the election. First, a threshold would need to be established. Because this election has no formal threshold, we instead have to use a natural threshold. There is no consensus on how to calculate natural thresholds, however, the Council of Europe recommends using the following formula:

Threshold = (0.75*Votes_total)/(seats+1)

For our example, with 103 ballots and 5 seats, the electoral threshold is 12.875 votes, or 12.5% of the vote. Once we know the threshold, we can then eliminate the party receiving the fewest first place votes (not counting parties receiving zero votes) and transfer the second place votes of the just eliminated party to other parties. We then move on to the next round and see the whether the transferred votes put parties either above the threshold, below the threshold or at zero. We want to keep eliminating and transferring the votes of the lowest non-zero party until all the party votes either are above the electoral threshold or at 0.

In our example, we will be eliminating the Fish Party first, because the Fish Party has the fewest non-zero votes. Notice we are NOT eliminating Goldfish, Rabbit or Horse votes yet, even though those parties are below the threshold at the moment. When the Fish party is eliminated, 1 vote transfers to Horse, 1 vote transfers to Rabbit, while the last vote is exhausted.

With Fish Party votes transferred, we get the following tallies going into the next round:

  • Cat: 42
  • Dog: 41
  • Goldfish: 8
  • Rabbit: 6
  • Horse: 5
  • Fish: 0
  • Parrot: 0

Once again, Goldfish, Rabbit and Horse all fall below the 12.875 vote threshold. In turn, we will be eliminating the Horse Party (but not Rabbit or Goldfish parties). When the Horse Party second place votes are transferred, we get the following tallies going in to the third round:

  • Cat: 42
  • Dog: 43
  • Goldfish: 8
  • Rabbit: 9
  • Horse: 0
  • Fish: 0
  • Parrot: 0

Both Goldfish and Rabbit are still below the threshold. Therefore, the Goldfish Party will be eliminated. After we eliminate the Goldfish Party, we get the following tally going into the fourth round:

  • Cat: 42
  • Dog: 43
  • Goldfish: 0
  • Rabbit: 15
  • Horse: 0
  • Fish: 0
  • Parrot: 0

At 15 votes, the Rabbit Party now has over 12.5% of the original 103 votes. In turn, we can end the vote transfers and now allocate the remaining votes based on our method of choice. Using either the Jefferson or Webster methods, the Cat and Dog parties both receive 2 seats while the Rabbit receives the remaining spot. With the Cat Party no longer in the majority, you can see that using STV concepts in proportional representation can lead to more accurately representative governments.

Part 2: Show me the spreadsheet

Here’s a spreadsheet I created that does just what I described in Part 1. After copying that sheet into your own Google Drive, the only cells you need to tinker with are the green cells in the Votes and InputsAndSummary pages. The Pet council election example has already been pasted onto the Votes page. While this spreadsheet to mainly set up to calculate multi-member elections, you can still conduct a single winner election by setting the seats cell in the InputsAndSummary page (cell B1) to 1.

What this spreadsheet does in general is:

  1. Count the number of first place votes each party receives
  2. Eliminate the lowest non-zero vote-getting party under the threshold
  3. Have parties that were ranked behind the just eliminated party fill in the gaps created by the elimination (2nd becomes 1st, 3rd becomes 2nd etc.)
  4. Recount the first place votes again
  5. Repeat steps 1 through 4 if there are still non-eliminated parties under the threshold

This spreadsheet should work as long as you have fewer than 10 parties, 999 votes and 200 party rank permutations. Votes need to be in the output spreadsheet format created by Google Form’s multiple choice grid, with all the parties in separate columns. In other words, column B should contain all the 1st place votes, column C all the 2nd place votes and so forth. It’s recommended that there are no gaps in the ballots; you probably don’t want to submit a ballot that has votes in columns B and D, but no votes in column C. Because semicolons are being used as delimiters, party names should not have any semicolons in them.

Part 3: Ranked choice party list spreadsheet, explained

Now let’s go into the details of what that the STV Closed Party-List Proportional Representation sheet does. The first thing the spreadsheet does is count the number of votes each ballot permutation receives. A permutation in this case are all the orders voters had ranked the parties; we want to count the number of voters who had ranked Horse 1st, Rabbit 2nd, Dog 3rd, the number of voters who had ranked Fish 1st, Parrot 2nd, the number of voters who had ranked Dog 1st and so on and so forth.

To get to that point, we need to create a column displaying the rankings each voter expressed into a single cell. Let’s go back to the example vote I used earlier. In cell E2 on the “Votes” page in the example sheet, add the following formula:

=“;”&B2&“;”&C2&“;”&D2&“;”

This formula places all the voters’ choices between semicolon delimiters. Placing parties between delimiters helps our spreadsheet deal with cases of names inside names (in our case, distinguishing between votes for Fish and Goldfish). Once you paste the formula, drag the formula down to the bottom of the spreadsheet (cell E104 in this example).

From there, you could use table filters on the vote page, manually counting the number of votes that are displayed when you select a filter. However, doing that with hundreds or even dozens of different permutations can be a tedious effort. Fortunately, there are formulas in Google Sheets that can count unique values quicker.

After creating those permutations, we need to create a new spreadsheet to eliminate and transfer votes. Let’s name it the Eliminator. The Eliminator sheet will list all the unique voting permutations and the quantity of each permutation. Before we start listing permutations, though, let’s add the number of seats to be filled in C1, the threshold formula in cell C2 (you should get a value of 12.875) and the total number of votes submitted in the election in cell C3 (103).

Back to permutations, Google Sheets conveniently has a single function to list unique values in a range, called the unique function, in contrast to Excel which requires you to use arrays to do the same thing. For the Pet Council election, add the following formula in cell B6 on the Eliminator sheet:

=unique(Votes!E2:E104)

This formula will list all the unique ballots below the formula; you should have 16 different permutations if you’re using the example election. If you update something within the permutation (i.e. within Votes!E2:E104), the unique function will automatically update, adding new permutations below if necessary.

In cell A6, display the number of votes each ballot permutation received with the following formula:

=countif(Votes!E$2:E$104, B6)

Don’t forget to drag the equation until all the permutations are counted.

Now, in cell C6 (the same row as the first permutation in column B), add the following formula and drag it down to the row of the last permutation:

=substitute(LEFT(B6,FIND(“;”,B6,2)1),“;”,“”)

This formula extracts the first place vote for each permutation, using the semicolon as the delimiter.

We now need to create another table to count the number of first place votes. In cell D6, add the following equation:

=unique(Votes!$B2:$B104)

With the all the unique first place choices listed out, you will now need to combine the number of votes each first place choice received (you’ll notice that column C still has duplicate entries). In cell E5, add the following formula:

=if(SUMIFS($A$6:$A$205,C$6:C$205,D6)>0,SUMIFS($A$6:$A$205,C$6:C$205,D6),“”)

Drag this formula down towards the last row, which, in our example, would be Fish. Given how we only have 6 unique parties, it’s easy tell that Fish, Rabbit, Horse and Goldfish all fall below the threshold and that Fish needs to be the party that is eliminated first just by looking. However, with more parties, it might be far more difficult to tell what needs to be eliminated. Fortunately, we have formulas that can be used determine just this.

To figure out what needs to be eliminated, we need a test to determine whether or not a party 1) is above the electoral threshold 2) is below the threshold or 3) already eliminated (i.e. has 0 votes). To do this, paste the following formula in cell F6 and drag it down towards to last row:

=if(or(E6>=$C$2,E6=0),“Good”,“Does not meet threshold”)

This formula will spit out the string “Good” if the value in column E is either above the threshold or 0/blank, or will spit out “Does not meet threshold” if the value in column E is above 0 but still below the threshold.

Finally, we need to determine which party should be eliminated and have their votes transferred in the next round. In another cell on the sheet (let’s use cell E13), add the following formula:

=if(countif(F6:F11,“Does not meet threshold”)>0,index(D6:D11,match(min(E6:E11),E6:E11,FALSE),1),“No more eliminations needed”)

This formula checks status of each party in column F. If there are parties below the threshold, then this formula will display the party with the lowest non-zero vote total (this formula will also randomly choose a party in the event of a tie). If all the parties have a “Good” status, then this formula will tell you that “no more eliminations [are] needed.” On the Eliminator sheet, this formula will tell us that Fish will need to be eliminated. Because more eliminations are needed, we need to move on to the next round.

In column G, add the following formula and drag it down to row 21, the row of the last permutation:

=substitute(B6,“;”&E$13,“”)

What this formula does is to eliminate all instances of the string “;Fish” from column B, which in turn will shift the any party ranked behind Fish over into the position where Fish used to occupy (e.g. the 2nd place party on ballots that had Fish Party as their first preference will now shift over into first place). In column H, we will once again be using the substitute equation, this time extracting the first place votes from column G:

=substitute(LEFT(G6,FIND(“;”,G6,2)1),“;”,“”)

Don’t forget to drag this equation down to the last permutation row.

We once again need to list all parties that received first place votes, count the number of first place votes each party has and then determine which party needs to be eliminated, if necessary. Thankfully, instead of typing out all those equations again, we can simply copy columns D, E and F over to columns I, J and K, as the cells referenced in those equations will automatically update when copied to a new column.

Once again, we see several parties that don’t meet the threshold, with the Horse party receiving the fewest votes. Therefore, to move onto the next round of eliminations and transfer the Horse votes, you simply need to copy columns G through K over to L through P. With Goldfish now needing elimination, you once again need to copy columns L through P over to Q through U. With this last round of copying, all the remaining parties now exceed the threshold. You’ll now be able to allocate seats.

If you’re not sure if you followed these instructions correctly, here’s how your spreadsheet should look like.

Finally, if you want to increase the number of votes on the Votes sheet, you will need to make sure the permutation formula (i.e. =“;”&B#&“;”&C#&“;”&D#&“;”) is copied down to the last row. Dragging that formula down in Google Sheets can take a while, though, especially if you’re adding thousands of new rows to the Votes sheet. You can quickly apply a formula to a whole column by double clicking the square on a highlighted cell’s bottom right corner. However, this technique will only copy down if there’s an adjacent column with data, and it will only copy down to the last consecutively filled row of that adjacent column.

Fortunately, I have a spreadsheet that can make this quick copy down easier right here, for up to 20,000 rows. Going back to our example, if you want to increase the number of votes on the Votes page, copy those 20,000 rows in column A from the spreadsheet I just provided and paste them onto column F in the Votes sheet. Then, highlighting cell E104 (copy down won’t work if there are filled cells underneath), double click the bottom right corner. The permutation formula should now be copied down past row 20,000. Don’t forget to update any cell that references the Votes sheet to include the new rows, specifically the cells in the Eliminator sheet that lists and counts all the unique permutations and first place votes (cells A6, B6 and D6 in our example).

Part 4: Links

How to Conduct Instant Runoff Voting with Google Forms

There aren’t many online tools to conduct instant runoff voting, also known as ranked-choice voting. However, it is still possible to do this manually using Google Forms and Google Sheets/Microsoft Excel without needing to run scripts.

Part 1: The Form

Instant runoff voting require voters to rank choices from their most preferred option to least preferred option. Google Forms does not have a survey option that allows users to rank candidates or choices. However, it is still possible to create something that resembles preferential voting using the available options.

When you create a question, select “Multiple choice grid” as your option. Your rows will be your rankings, from most preferred to least preferred, while the columns will contain your candidates. We don’t want voters giving the same ranking multiple times to a candidate. Therefore, we will need to limit voters to only one response per column. To do that, simply click on the three dots on the bottom right hand corner of the question and select the “Limit to one response per column” option. To encourage voters to actually rank the candidates, as opposed to just selecting a single candidate, enable the “Require a response in each row” option at the bottom of the question.

OneColumnOneRow

The options that needs to be enabled in Google Form

For our example, let’s say we want to vote for our favorite city. We have four options: Dallas, Houston, Sydney and London. Therefore, the columns will be the cities, while the rows will be a ranking from 1 to 4. As mentioned earlier, we also want to allow only one response per column and require voters to fill out each row in the form. This is how your form should look like to you, the creator:

VotingFormCreator

And this is how the survey should look like to voters (link):

VotingFormVoter

After tinkering with overall settings (e.g. limiting the number of responses, deciding whether or not to require an email address), you may send out your form. Note that Google Form does not allow you to randomize the columns.

Part 2: Spreadsheet

Let’s say we got 23 responses for the favorite city ballot and that the survey graph looks like this:

FavoriteCityChart

London got the most 1st place votes with 8, Houston got the second most 1st place votes with 7, Dallas go the third most 1st places votes with 6 and Sydney came in last at 2. London might have gotten the most votes in the first round, but to win, a city needs to receive a majority of the vote (12). This is where we move on to the spreadsheet.

On the response page, click on the green button at the top right corner of the page. In the window that pops up, select “Create a new spreadsheet.” This will create a linked page in a new Google Sheets file. Each row is a response/ballot, while each column is the ranking each ballot gave to each candidate. The columns are arranged left to right from most preferred to least preferred. You can view the spreadsheet here.

Create a new sheet named Round 1 and copy the linked table to this new sheet.

Round1Table

Now we will count up the vote. To do this, list all the choices in the rows below the timestamp column. For example, you would list Dallas at A26, Houston at A27, London at A28 and Sydney at A29. In column B, underneath the first choice column, use the following formula:

=countif(B$2:B$[# of responses – 1],$A[Row of Candidate])

Or in our case,

=countif(B$2:B$24,$A26)

Drag that formula down to the other choices. Doing so in our example should yield the same number of first place votes shown on the survey graph. As mentioned, no one received the requisite 12 votes to win the election. In turn, because Sydney received the fewest votes, we will eliminate Sydney and transfer all of Sydney’s votes into the second round.

To do this in Google Sheets, duplicate the Round 1 sheet and rename the new sheet Round 2. Highlight the results table and, under Data, select “Create a filter.” Your spreadsheet to resemble this:

Round2Filter

Under the first choice column (aka column B), click on the green filter triangle button and, in the dropdown menu, select “Sort A -> Z.” We need to sort alphabetically because Google Sheets (and Microsoft Excel) does not allow you to cut/copy and paste non-contiguous cells. Then, still remaining in the dropdown menu, deselect all the choices except for Sydney. Highlight the Sydney entries and press delete.

Round2DeleteSydney

Then, highlight the remaining entries starting in column C, cut those cells and paste those entries into column B. Your spreadsheet should now look like this:

Round2Cut

Both Sydney votes ranked London as their second choice. Because of this, London now has 10 votes, which is still not enough to win. This time, Dallas has the fewest votes at the end of Round 2. Therefore, we will eliminate Dallas and transfer Dallas’ votes to the other cities.

Once again, duplicate the Round 2 sheet and rename it Round 3. Making sure that column B in the table is sorted alphabetically, delete all the Dallas entries and shift the remaining entries over to column B. Doing so gives is the following results:

Round3Table

As you can see, Sydney has one vote. However, Sydney has already been eliminated. As we did before, we will eliminate Sydney and move the remaining entries into column B. Because that ballot’s third choice was London, we get the following final tally:

  • Houston: 11
  • London: 12

Thus, London is the winner.

Part 3: Tie Breaking

Sometimes, you might get tied candidates in your runner-ups. One way to deal with tie-breakers is to simply eliminate a random candidate. Another method is to eliminate all the tied candidates. However, there are other more objective ways to do tie breakers.

If the tied candidate votes don’t add up to to a majority, then you may eliminate those options. However, you might get a situation where the tied options do make up a majority of the votes, as seen below (link):

TiedGraph

In the example above, John received 5 votes while everyone else received 4 votes for 17 votes total. Eliminating the other three candidates and declaring John the winner, though, will probably not be in everyone’s best interest, given all the low rankings John received.

Therefore, we need to take a look at the second place votes each candidate received . To do that, highlight and drag the countif formulas in column B to column C (link to spreadsheet). You should now see a tally of second place votes.TiedSecondPlaceVotes

Once again, we have a tie, with Bodhi and Jimmy both receiving four 2nd place votes. However, because the sum of Bodhi’s and Jimmy’s vote is less than a majority (8), we can eliminate all ballots that had Bodhi or Jimmy as their first pick and transfer the votes.

Once again, we will eliminate all the Bodhi and Jimmy entries in column B and shift those ballots over. In Round 2, 5 votes will transfer to Tony while only 2 votes will transfer over to John. With a 9 vote majority, Tony wins the election. TiedRound2

How to unlock all characters on the Steam version of Unreal Tournament 2004

When you first start Unreal Tournament 2004, you’ll notice that three characters, Xan, Malcolm and ClanLord, are locked in the avatar selection screen.

locked characters

The normal way to unlock them is by beating the game. However, if you don’t want to beat the game, you can simply unlock them by editing your user.ini file, located inside the System folder. Many websites will tell you that you simply need to add the following line of code at the bottom of user.ini:

[GUI2K4.UT2k4MainPage]
TotalUnlockedCharacters=Malcolm;ClanLord;Xan

This code, though, is not enough for the Steam version of Unreal Tournament 2004, given how the Steam version’s user.ini is missing many lines. Instead, your additional lines of code should look like this:

[GUI2K4.UT2k4ServerBrowser]
bStandardServersOnly=True
CurrentGameType=Onslaught.ONSOnslaughtGame
bPlayerVerified=True

[GUI2K4.UT2k4MainPage]
TotalUnlockedCharacters=Malcolm;ClanLord;Xan

Now you can play with those three previously locked characters without needing to beat the game (and cheat to your heart’s delight through the single player campaign)

unlocked

How to create your own Payday 2 weapon mods with LUA

Ever wish you could make certain Payday 2 weapons more useful and balanced? Maybe you wanted to modify damage, ammo pickup or rate of fire. Well, you can do all of that, and some more, with Payday 2 LUA mods.

First, let’s go over what Payday 2 files control weapon damages. There are two main files we will be working with: weapontweakdata.lua and tweakdata.lua. As their extension implies, these files are in the LUA format and can be edited with a notepad program. Weapontweakdata.lua contains the stats for all the weapons (concealment, fire rate, etc.) except for non-bullet projectile damage. Tweakdata.lua contains the stats for non-bullet projectile damages (arrows, rockets) as well as throwable damages. Tweakdata.lua also defines a lot of other different things, such as voice lines, but for the sake of this article, we will only be looking at what it does with respect to weapon damages.

To modify these stats, you will not be modifying weapontweakdata.lua or tweakdata.lua directly, as they are buried inside Payday 2’s game files. Instead, you will need something called a LUA hook which will inject your code into the game. The most popular LUA injector is the Payday 2 BLT. Just read in the instructions on that page to set up BLT.

Note that these mods will only work with game hosts. Other players that join your game will not be able to use these mods and these mods will be disabled if you join another player’s game.

Part 1: Automatic Friend

Now let’s get to our example mod. Let’s say we want to make the Little Friend act like how it did in Scarface, an assault/battle rifle that sprays bullets everywhere instead of firing single shots like a DMR. This will entail nerfing the damage, while increasing the amount of ammo you can pickup and carry along. As a bullet based weapon, we will be injecting code into weapontweakdata.lua.

After installing BLT, create a folder inside the Payday 2 mods folder. Let’s name this folder MyWeaponMods. Inside MyWeaponMods, create a LUA file with a notepad program named WeaponMods.lua. BLT will be injecting this file into weapontweakdata.lua. Open WeaponMods.lua and set up the file like this:

local old_init = WeaponTweakData.init
function WeaponTweakData:init(tweak_data)
old_init(self, tweak_data)

end

In between old_init(self, tweak_data) and end will be your weapon variables. Your weapon variables will be set up like this:


self.[weaponID].[variable]

WeaponID refers to the internal weapon name Payday 2 uses. You can find a list of weapon IDs here. For the Little Friend, the weaponID is named contraband. The default values of the variables we will be modifying are as follow:

self.contraband.CLIP_AMMO_MAX = 20
self.contraband.NR_CLIPS_MAX = 2
self.contraband.AMMO_MAX = self.contraband.CLIP_AMMO_MAX * self.contraband.NR_CLIPS_MAX
self.contraband.AMMO_PICKUP = self:_pickup_chance(self.contraband.AMMO_MAX, 1)
self.contraband.FIRE_MODE = "single"
self.contraband.fire_mode_data = {fire_rate = 0.098}
self.contraband.auto = {fire_rate = 0.098}
self.contraband.stats.damage = 160

Let’s first start with modifying ammo. Self.contraband.CLIP_AMMO_MAX refers to the number of bullets in each clip, self.contraband.NR_CLIPS_MAX refers to the number of clips you can carry, self.contraband.AMMO_MAX refers to the total number of bullets you can carry while self.contraband.AMMO_PICKUP refers to the pickup rate. All of these values are before weapon mods are applied. CLIP_AMMO_MAX, NR_CLIPS_MAX and AMMO_MAX are not too hard to understand. Let’s set CLIP_AMMO_MAX to 30, NR_CLIPS_MAX to 3 and copy the original AMMO_MAX equation.

AMMO_PICKUP and the self:_pickup_chance(x,y), on the other hand, is a little trickier. The first number in self:_pickup_chance is what I will call the reference number. This reference number is usually equivalent to AMMO_MAX. The second number is the pickup chance rate, a percentage of the reference number you will pick up from each ammo box. The second number does not really correspond to a percentage; a value of 1 means a pickup rate of between 1% to 3.5%. In turn, if you leave this variable alone, we will get about 1 to 3 bullets for every ammo box we pickup.

If you want a higher pickup rate, say between 2 to 4 bullets per box, you may instead opt for this line of code:

self.contraband.AMMO_PICKUP = {2, 4}

As you may surmise, the two numbers in the curly brackets refer to the range of bullets you will pick up from each ammo box.

Now let’s look a fire rate. Self.contraband.FIRE_MODE refers to the default fire mode, which, for the Little Friend, is single fire mode. To make it into the assault rifle we desire, we should change “single” to “auto”.

Now lets look at self.contraband.fire_mode_data and self.contraband.auto. These variables are set up as follows:

self.contraband.fire_mode_data = {fire_rate = 0.098}
self.contraband.auto = {fire_rate = 0.098}

Fire_mode_data controls the fire rate for single fire, while auto controls automatic fire rate. Both variables usually have the same fire_rate value. The fire_rate value is in seconds per bullets. In other words, fire_rate = 60/(rounds per minute). We want the fire rate to be 800 rounds/minute. Therefore, fire_rate =0.075.

Finally, let’s set damage to 80. As you can surmise from the code, we will be changing self.contraband.stats.damage from 160 to 80.

After modifying these values, WeaponMods.lua should now look like this:

local old_init = WeaponTweakData.init
function WeaponTweakData:init(tweak_data)
old_init(self, tweak_data)

self.contraband.CLIP_AMMO_MAX =30
self.contraband.NR_CLIPS_MAX = 3
self.contraband.AMMO_MAX = self.contraband.CLIP_AMMO_MAX * self.contraband.NR_CLIPS_MAX
self.contraband.AMMO_PICKUP = {2,4}
self.contraband.FIRE_MODE = "auto"
self.contraband.fire_mode_data = {fire_rate = 0.075}
self.contraband.auto = {fire_rate = 0.075}
self.contraband.stats.damage = 80

end

As you might have noticed from looking at the source code, we did not recreate weapontweakdata.lua in its entirety, as the injector only replaces the lines you have changed.

While we’re still on the topic of modifying the Little Friend, you might be tempted to set the self.contraband.stats.damage variable to ludicrously high values, for debug purposes of course. What you’ll find out though is that the maximum value of self.[WeaponID].stats.damage is 210. To exceed the 210 max, you’ll need another variable, self.[WeaponID].stats_modifiers = {damage = X}, where X is the damage multiplier. So if you wanted, say 9000 damage (again, totally for debugging purposes), for your Little Friend, you would set self.contraband.stats.damage = 1 and self.contraband.stats_modifiers = {damage = 9000}.

And, while we’re still on the topic of “debugging,” did you know that you can make any bullet weapons penetrate walls and shields? You just need to add the following three variables for your respective weapon:

self.[WeaponID].can_shoot_through_enemy = true
self.[WeaponID].can_shoot_through_shield = true
self.[WeaponID].can_shoot_through_wall = true

Note that this is an all-or-nothing proposition. If the variable is set to true, all your bullets will penetrate walls, shields or enemies. If it’s false, none of your bullets will do this. There is no variable that allows bullets to only penetrate some of the time.

Part 2: Semi-automatic Crossbow, Better Throwing Axe

Now that we got a Little Friend that sprays bullets, now lets make the Heavy Crossbow semiautomatic and hold several arrows per clip. To modify fire rate and clip size, we will still be injecting code into weapontweakdata.lua. But because Heavy Crossbow arrow damage is not a bullet damage, we will also have to inject code into tweakdata.lua.

Let’s once again open WeaponMod.lua. Let’s say we want the Heavy Crossbow to have 5 arrows per clip, 40 arrows total and fire at 2 arrows per second. To prevent the crossbow from being overpowered, we will be lowering the damage to 500. Therefore, we will be adding the following lines to WeaponMod.lua:

self.arblast.stats_modifiers = {damage = 25}
self.arblast.CLIP_AMMO_MAX = 5
self.arblast.NR_CLIPS_MAX = 8
self.arblast.AMMO_MAX = self.arblast.CLIP_AMMO_MAX * self.arblast.NR_CLIPS_MAX
self.arblast.fire_mode_data.fire_rate = 0.5

Now your WeaponMods.lua should look like this:

local old_init = WeaponTweakData.init
function WeaponTweakData:init(tweak_data)
old_init(self, tweak_data)

self.contraband.CLIP_AMMO_MAX =30
self.contraband.NR_CLIPS_MAX = 3
self.contraband.AMMO_MAX = self.contraband.CLIP_AMMO_MAX * self.contraband.NR_CLIPS_MAX
self.contraband.AMMO_PICKUP = {2,4}
self.contraband.FIRE_MODE = "auto"
self.contraband.fire_mode_data = {fire_rate = 0.075}
self.contraband.auto = {fire_rate = 0.075}
self.contraband.stats.damage = 80

self.arblast.stats_modifiers = {damage = 25} --self.arblast.stats.damage = 20
self.arblast.CLIP_AMMO_MAX = 5
self.arblast.NR_CLIPS_MAX = 8
self.arblast.AMMO_MAX = self.arblast.CLIP_AMMO_MAX * self.arblast.NR_CLIPS_MAX
self.arblast.fire_mode_data.fire_rate = 0.5

end

“Wait!” you might say, pointing out self.arblast.stats_modifiers = {damage = 25}, “You said that tweakdata.lua controlled arrow damage, not weapontweakdata.lua!” Well, yes, we really don’t need to add the damage stat to WeaponMod.lua, the file whose code will be injected into weapontweakdata.lua. But even though weapontweakdata.lua does not control arrow damage, it still controls the crossbow damage that appears on the weapon stats box. So, for information’s sake, I still recommend adding crossbow damage stat to WeaponMod.lua.

Now let’s make the file that will be injecting code into tweakdata.lua. Let’s create a file named TweakData_Mod.lua and add the following lines of code into that file:

if not tweakstats then
if not tweak_data then return end

tweakstats = true
end

In between if not tweak_data then return end and tweakstats = true will be where you add your weapon variables. This time, projectile damage will be in the following format:

tweak_data.projectiles.[projectile name].damage

For Heavy Crossbow arrows, the project name is arblast_arrow and the variable we’ll be modifying is tweak_data.projectiles.arblast_arrow.damage. All projectile damage values will be multiplied by 10. Therefore, for 500 damage crossbows, tweak_data.projectiles.arblast_arrow.damage = 50.

As mentioned earlier, tweakdata.lua also controls throwable damage. Let’s modify the throwing axe. As the throwing axe has the same damage as the throwing knives, but half the capacity, it’s a totally useless throwable. So why not buff the damage to 2,000 and make it an intermediary projectile between throwing knives and the javelin?

The projectile name for the throwing axe is wpn_prj_hur. As mentioned earlier, weapon damage is multiplied by 10 in tweakdata.lua. Therefore, tweak_data.projectiles.wpn_prj_hur.damage = 200.

After modifying the Heavy Crossbow and throwing axe, TweakData_Mod.lua should now look like this:

if not tweakstats then
if not tweak_data then return end

tweak_data.projectiles.arblast_arrow.damage = 50
tweak_data.projectiles.wpn_prj_hur.damage = 200
tweakstats = true
end

Side note: I don’t think every projectile damage is able to be modified. Weapons whose damage I can’t modify so far includes the Pistol Crossbow and the Plainsrider Bow.

Part 3: Putting the mod together

You’ve got the 2 files you will be using for your mod. Now we need to create mod.txt, your mod definition file. After creating the file, open mod.txt, and post the following lines of code:

{
"name" : "My Weapons Mod",
"description" : "A weapon mod I created",
"author" : "Me",
"contact" : "My email",
"version" : "1.0",
"color" : "0 255 255",
"blt_version" : 2,
"disable_safe_mode" : false,

"hooks" : [
{
"hook_id" : "lib/tweak_data/weapontweakdata",
"script_path" : "WeaponMod.lua"
},
{
"hook_id" : "lib/tweak_data/tweakdata",
"script_path" : "TweakData_Mod.lua"
}
]

}

The “name,” “description” etc. lines are pretty straight forward. The “hooks” line, though, defines the lua files BLT will be injecting your code into. From these lines, you can see that WeaponMod.lua will be injected into weapontweakdata.lua, while TweakData_Mod.lua will be injected into tweakdata.lua, just as we want it to.

Now let’s see what we modified in action:

You can download what we just created here:

http://www.mediafire.com/file/rllp3dsojwha44w/MyWeaponMods.7z

Special thanks to UnknownCheats, r/paydaytheheistmods subreddit and modworkshop for their example codes

How to reduce pixelation and blurriness in your action packed Youtube video

If your video has a lot of camera movements and action (e.g. gaming videos), your video will probably be filled with bunch of pixelation and annoying artifacts. The way I solved this issue is by simply uploading the video at a resolution of 2560×1440 or greater and setting the bitrate at whatever Youtube recommends at that resolution.

I’ve uploaded a series of comparison videos from two video games where I had experienced a lot of pixelation and blurriness problems in my gameplay footage: Payday 2 and Shogun 2. For both games, the original video was recorded in Open Broadcaster Software (OBS) with a resolution of 1600×900 and a bitrate of about 90,000 kbps.

Here’s the playlist for the Payday 2 videos.  You can see some comparison screenshots below or here on imgur.

This slideshow requires JavaScript.

This slideshow requires JavaScript.

All of these screenshots were taken directly from the Youtube video player set in theater mode on the Firefox browser. Look at how the HRT goes from a white-green blob at 720p to an actual human at 4K. Look at how much more crisp the shadows are. Look at how you can actually read the street signs.

(Side note: downloading the video from Youtube usually yields a better video quality compared to the online version)

Seeing how screen resolution plays a huge role in reducing the amount of artifacts, one may be tempted to compress a 2560×1440 video at 15,000 kbps (half the bitrate Youtube recommends) to save some space. Sadly, though, this trick doesn’t seem to work, as the 1440p video looks about as blurry as the 1080p video at the same bit rate.

This slideshow requires JavaScript.

Now let’s take a look at Shogun 2 video quality. You can see comparison screenshots below or on this imgur page.

This slideshow requires JavaScript.

This slideshow requires JavaScript.

Like with Payday 2, Shogun 2’s video quality noticeably improves the higher the resolution we get.

Uploading a video at +1440p at half the recommended bitrate does not appear to remove a lot of the artifacts. But what if we instead decided to upload the video at a higher bitrate than recommended? Sadly, you’ll just be wasting hard drive space by doing this, as there is barely any quality difference:

This slideshow requires JavaScript.

In conclusion, higher resolutions will give you better video quality as long as your bitrate is at the recommended level. Any higher bitrate would be wasting hard drive space.